
Overview
The Microsoft Azure Backup is a backup solution that uses the services of the Microsoft Azure public cloud to store and orchestrate the backup workload.
This solution has an architecture of server/client, therefore all the servers to be protected by the service must contain the Azure Backup Agent installed and registered on a Backup Vault on Microsoft Azure.
This blog post shows how to:
- Set up Backup Server on a VM.
-
Create a volume on a virtual disk in a storage pool:
-
- Add a disk to a storage pool and create a virtual disk with simple layout.
- Add a disk to a storage pool and create a virtual disk with simple layout.
-
- Add any additional disks, and extend the virtual disk.
- Add any additional disks, and extend the virtual disk.
-
- Create volumes on the virtual disk.
- Create volumes on the virtual disk.
- Add the volumes to Backup Server.
- Configure workload-aware storage.
Add storage to Azure Backup Server
Azure Backup Server V2 and later supports Modern Backup Storage that offers storage savings of 50 percent, backups that are three times faster, and more efficient storage. It also offers workload-aware storage.
Note
To use Modern Backup Storage, you must run Backup Server V2 or V3 on Windows Server 2016 or V3 on Windows Server 2019. If you run Backup Server V2 on an earlier version of Windows Server, Azure Backup Server can’t take advantage of Modern Backup Storage. Instead, it protects workloads as it does with Backup Server V1.
Create a volume for Modern Backup Storage
The first backup copy is kept on storage attached to the Azure Backup Server machine. For more information about adding disks, see
Creating a Storage Pool on Windows Server 2019
In the Azure Backup Server console, click Management > Production Servers > Add.

In Production Server Addition Wizard > Select Production Server type page, select Windows Servers, and then click Next.

On the Select Agent Deployment Method page, select Install agents >Next. The Protection Agent Installation Wizard opens.

On the Select Computers page, DPM displays a list of available computers in the same domain as the DPM server. Select one or more computers (50 maximum), from the Computer name list > Add > Next.
- If this is the first time you have used the wizard, DPM queries Active Directory to get a list of potential computers. After the first installation, DPM displays the list of computers in its database, which is updated once each day by the auto-discovery process.
- To add multiple computers by using a text file, click the Add from File button, and in the Add from File dialog box, type the location of the text file or click Browse to navigate to its location.

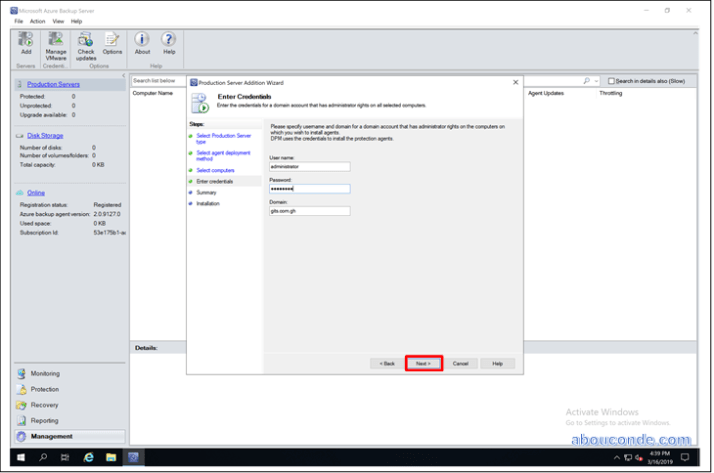
On the Enter Credentials page, type the user name and password for a domain account that is a member of the local Administrators group on all selected computers.
- In the Domain box, accept or type the domain name of the user account that you are using to install the protection agent on the target computer. This account may belong to the domain that the DPM server is located in or to a domain that has a two-way trust relationship with the domain that the DPM server is located in.
- If you’re installing a protection agent on a computer across a trusted domain, enter your current domain user credentials. You can be a member of any domain that has a two-way trust relationship with the domain that the DPM server and you must be member of the local Administrators group on all selected computers on which you want to install an agent.
- If you select a node in a cluster, DPM detects all additional nodes in the cluster and displays the Select Cluster Nodes page.
On the Choose Restart Method page, select the method to use to restart the selected computers after the protection agent is installed. The computer must be restarted before you can start protecting data. A restart is necessary to load the volume filter that DPM uses to track and transfer block-level changes between the DPM server and the protected computers.
- If you select to restart the computers later the protection agent installation status isn’t refreshed automatically on the Agents tab in the Management task area after the computer restart, and you’ll need to click Refresh Information.
- Note that you don’t need to restart the computer if you are installing a protection agent on another DPM server.
- If any of the computers that you selected are nodes in a cluster, an additional Choose Restart Method page appears that you can use to select the method to restart the clustered computers. You’ll need to install a protection agent on all nodes in a cluster to successfully protect the clustered data. The computers must be restarted before you can start protecting data. Because of the time required to start services, it might take a few minutes after a restart before DPM can contact the agent on the cluster.
- DPM will not automatically restart a computer that belongs to a Microsoft Cluster Server (MSCS) cluster. You must manually restart computers in an MSCS cluster.

On the Summary page, click Install to begin the installation. If the EULA appears accept it for installation to start. On the Task tab of the Installation page you can see whether the installation is successful. You can click Close before the wizard is finished and monitor the installation progress in Agents tab in the Management task area. If the installation is unsuccessful, you can view the alerts in the Monitoring task area on the Alerts tab.
Note: After you install a protection agent on a computer that is part of a Windows SharePoint Services farm, each of the computers in the farm will not appear as protected computers on the Agents tab in the Management task area, only the computer that you selected. However, if the Windows SharePoint Services farm has data on the selected computer, DPM protects the data on all of the computers in the farm, provided all of them have the protection agent installed.

Add volumes to Backup Server disk storage
To add a volume to Backup Server, in the Management pane, rescan the storage, and then select Add. A list of all the volumes available to be added for Backup Server Storage appears. After available volumes are added to the list of selected volumes, you can give them a friendly name to help you manage them. To format these volumes to ReFS so Backup Server can use the benefits of Modern Backup Storage, select OK.

Volume Added Successfully to the Backup Server.

