A virtual machine scale set allows you to deploy and manage a set of identical, auto-scaling virtual machines.
You can scale the number of VMs in the scale set manually, or define rules to autoscale based on resource usage like CPU, memory demand, or network traffic.
In this post, you will learn how to create a Virtual machine scale set using Azure management portal.
Log in to Azure
Log in to the Azure portal at http://portal.azure.com.
Click Create a resource in the upper left-hand corner of the Azure portal.
Search for scale set, choose Virtual machine scale set, then select Create.

Enter a name for the scale set, such as vmscaleset.
Select your desired OS type, such as Windows Server 2016 Datacenter.
Enter your desired resource group name, such as ScalableApp, and location, such as West Europe.

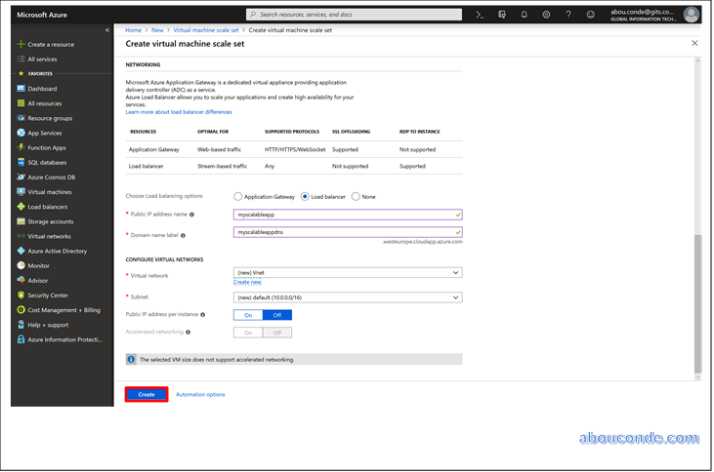
Enter a Public IP address name, such as myscalableapp.
Enter a unique Domain name label, such as myscalableappdns.
This DNS label forms the base of the FQDN for the load balancer in front of the scale set.
To confirm the scale set options, select Create.
Create a rule to automatically scale out
Select the resource group that contains your scale set, then choose your scale set from the list of resources.
Choose Scaling from the menu on the left-hand side of the scale set window. Select the button to Enable autoscale:

Enter a name for your settings, such as autoscale, then select the option to Add a rule.
Let’s create a rule that increases the number of VM instances in a scale set when the average CPU load is greater than 70% over a 5-minute period.
When the rule triggers, the number of VM instances is increased by 20%. In scale sets with a small number of VM instances, you could set the Operation to Increase count by and then specify 1 or 2 for the Instance count.
In scale sets with a large number of VM instances, an increase of 10% or 20% VM instances may be more appropriate.
To create the rule, select Add

Review and Save

Connect to a VM in the scale set
When you create a scale set in the portal, a load balancer is created.
Network Address Translation (NAT) rules are used to distribute traffic to the scale set instances for remote connectivity such as RDP or SSH.
To view these NAT rules and connection information for your scale set instances:
Select the resource group you created in the previous step,
From the list of resources, select your Load balancer,
Choose Inbound NAT rules from the menu on the left-hand side of the window.
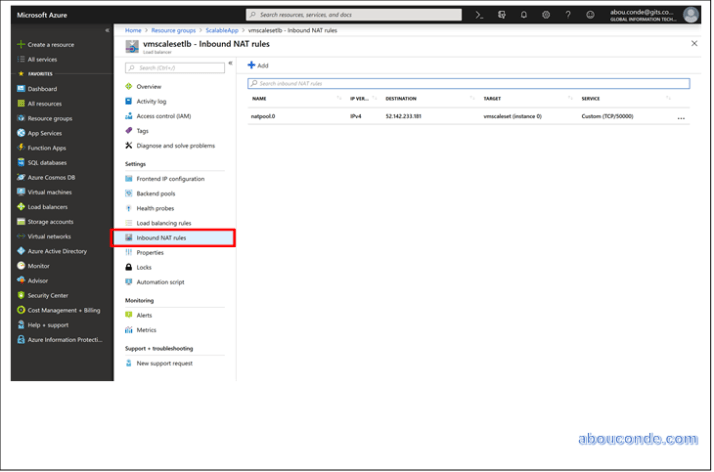
You can connect to VM in the scale set using these NAT rules.
VM instance lists a destination IP address and TCP port value. For example,
Destination IP address is 52.142.233.181 and the TCP port is 50000, you connect to the VM instance as follows:
Connect to the VM instance with RDP on 52.142.233.181
When prompted, enter the credentials you specified from the previous step when you created the scale set.