Overview
A hybrid cloud is a computing environment that combines a public cloud and a private cloud by allowing data and applications to be shared between them. When computing and processing demand fluctuates, hybrid cloud computing gives businesses the ability to seamlessly scale their on-premises infrastructure up to the public cloud to handle any overflow—without giving third-party datacenters access to the entirety of their data. Organizations gain the flexibility and computing power of the public cloud for basic and non-sensitive computing tasks, while keeping business-critical applications and data on-premises, safely behind a company firewall.
Using a hybrid cloud not only allows companies to scale computing resources, it also eliminates the need to make massive capital expenditures to handle short-term spikes in demand as well as when the business needs to free up local resources for more sensitive data or applications. Companies will pay only for resources they temporarily use instead of having to purchase, program, and maintain additional resources and equipment that could remain idle over long periods of time. Hybrid cloud computing is a “best of all possible worlds” platform, delivering all the benefits of cloud computing—flexibility, scalability, and cost efficiencies—with the lowest possible risk of data exposure.
This blog post shows how to create a Site-to-Site VPN gateway connection from your on-premises network to Azure virtual network.
A Site-to-Site VPN gateway connection is used to connect your on-premises network to an Azure virtual network over an IPsec/IKE (IKEv1 or IKEv2) VPN tunnel. This type of connection requires a VPN device located on-premises that has an externally facing public IP address assigned to it.
We are using these values to create our Lab Environment
- VNet Name: hybrid-vnet
- Address Space: 192.168.0.0/16
- Subscription: The subscription you want to use
- Resource Group: hybrid-cloud
- Location: West Europe
- Subnet: default: 192.168.2.0/24
- Gateway Subnet name: GatewaySubnet (this will auto-fill in the portal)
- Gateway Subnet address range: 192.168.1.0/24
- DNS Server: 8.8.8.8 – Optional. The IP address of your DNS server.
- Virtual Network Gateway Name: azure-vpn-gateway
- Public IP: azure-vpn-pip
- VPN Type: Route-based
- Connection Type: Site-to-site (IPsec)
- Gateway Type: VPN
- Local Network Gateway Name: on-prem-gateway
- Connection Name: local-to-azure
- Shared key: For this example, we use abc123. But you can use whatever is compatible with your VPN hardware. The important thing is that the values match on both sides of the connection.
Create a virtual network
Click Create a resource. In the Search the marketplace field, type ‘virtual network’. Locate Virtual network from the returned list and click to open the Virtual Network page.
Click Create. This opens the Create virtual network page.

On the Create virtual network page, configure the VNet settings.
- Name: hybrid-vnet
- Address space: 192.168.0.0/16
- Subscription: Verify that the subscription listed is the one you want to use. You can change subscriptions by using the drop-down.
- Resource group: hybrid-cloud (click Create new to create a new group)
- Location: West Europe
- Subnet: default
- Address range: 192.168.2.0/24
Click Create to create the VNet.

Create the gateway subnet
The virtual network gateway uses specific subnet called the gateway subnet. The gateway subnet is part of the virtual network IP address range that you specify when configuring your virtual network. It contains the IP addresses that the virtual network gateway resources and services use. The subnet must be named ‘GatewaySubnet’ in order for Azure to deploy the gateway resources.
In the portal, navigate to the virtual network for which you want to create a virtual network gateway.
On your virtual network page, click Subnets to expand hybrid-vnet – Subnets page.
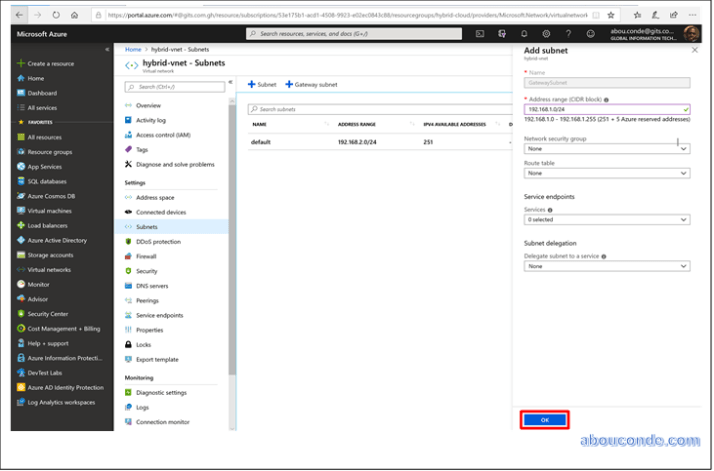
Click +Gateway subnet at the top to open the Add subnet page.
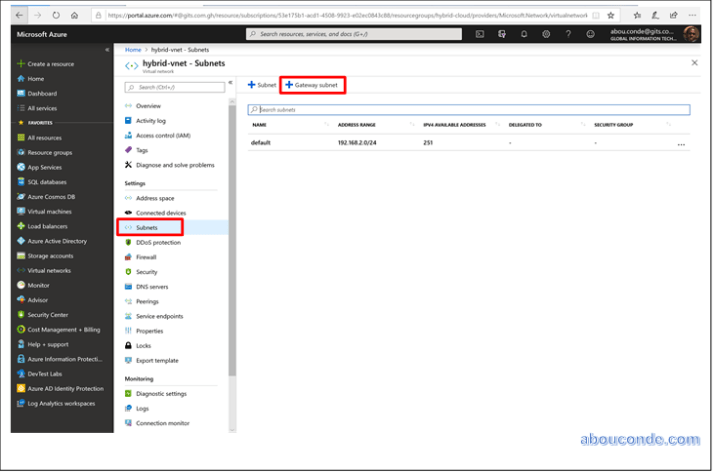
The Name for your subnet is automatically filled in with the required value ‘GatewaySubnet’. Adjust the auto-filled Address range (CIDR block) to match the following value:
Address range (CIDR block): 192.168.1.0/24
Leave the rest of the settings as the defaults of None or 0 selected. Then, click OK to create the gateway subnet.
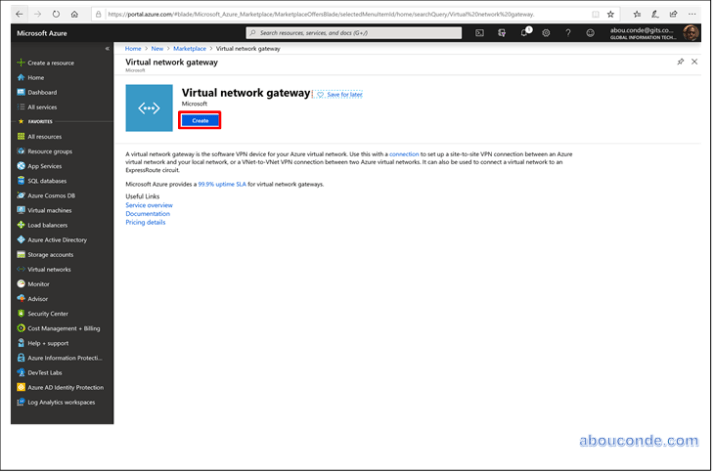
Create the VPN gateway
On the left side of the portal page, click + and type ‘Virtual Network Gateway’ in search. In Results, locate and click Virtual network gateway.
At the bottom of the ‘Virtual network gateway’ page, click Create. This opens the Create virtual network gateway page.
On the Create virtual network gateway page, specify the values for your virtual network gateway.
- Name: Name your gateway. This is not the same as naming a gateway subnet. It’s the name of the gateway object you are creating.
- Gateway type: Select VPN. VPN gateways use the virtual network gateway type VPN.
- VPN type: Select the VPN type that is specified for your configuration. Most configurations require a Route-based VPN type.
- SKU: Select the gateway SKU from the dropdown. The SKUs listed in the dropdown depend on the VPN type you select. Only select Enable active-active mode if you are creating an active-active gateway configuration. Otherwise, leave this setting unselected.
- Location: You may need to scroll to see Location. Adjust the Location field to point to the location where your virtual network is located. For example, West US. If the location is not pointing to the region where your virtual network resides, when you select a virtual network in the next step, it will not appear in the drop-down list.
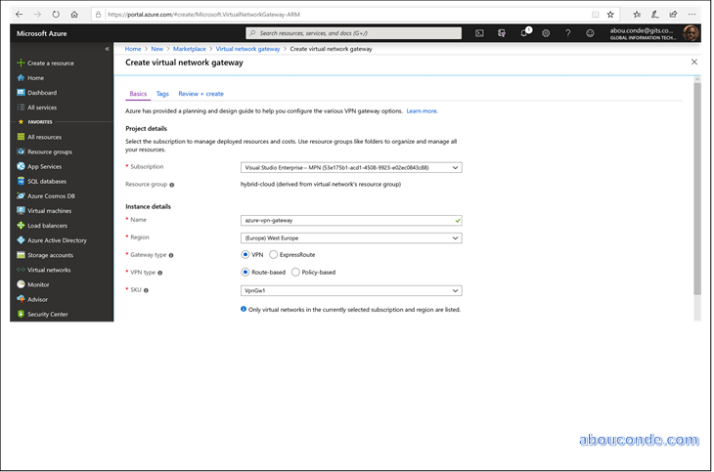
- Virtual network: Choose the virtual network to which you want to add this gateway. Click Virtual network to open the ‘Choose a virtual network’ page. Select the VNet. If you don’t see your VNet, make sure the Location field is pointing to the region in which your virtual network is located.
-
Public IP address: This setting specifies the public IP address object that gets associated to the VPN gateway. The public IP address is dynamically assigned to this object when the VPN gateway is created. VPN Gateway currently only supports Dynamic Public IP address allocation. However, this does not mean that the IP address changes after it has been assigned to your VPN gateway. The only time the Public IP address changes is when the gateway is deleted and re-created. It doesn’t change across resizing, resetting, or other internal maintenance/upgrades of your VPN gateway.
- Leave Create new selected.
- In the text box, type a Name for your public IP address.
- Leave Configure BGP ASN deselected, unless your configuration specifically requires this setting. If you do require this setting, the default ASN is 65515, although this can be changed.
- Verify the settings. You can select Pin to dashboard at the bottom of the page if you want your gateway to appear on the dashboard.
- Click Create to begin creating the VPN gateway. The settings are validated and you’ll see the “Deploying Virtual network gateway” tile on the dashboard. Creating a gateway can take up to 45 minutes. You may need to refresh your portal page to see the completed status. gateway.
- Leave Create new selected.

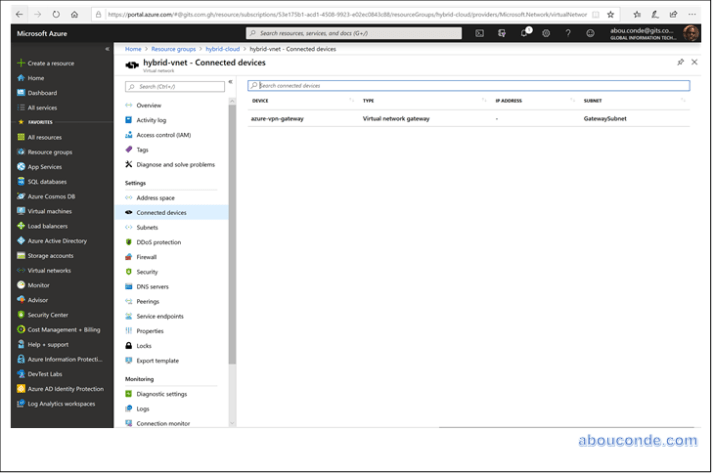
After the gateway is created, view the IP address that has been assigned to it by looking at the virtual network in the portal. The gateway appears as a connected device. You can click the connected device (your virtual network gateway) to view more information.
Create the local network gateway
The local network gateway typically refers to your on-premises location. You give the site a name by which Azure can refer to it, then specify the IP address of the on-premises VPN device to which you will create a connection.
In the portal, click +Create a resource.
In the search box, type Local network gateway, then press Enter to search. This will return a list of results. Click Local network gateway, then click the Create button to open the Create local network gateway page.
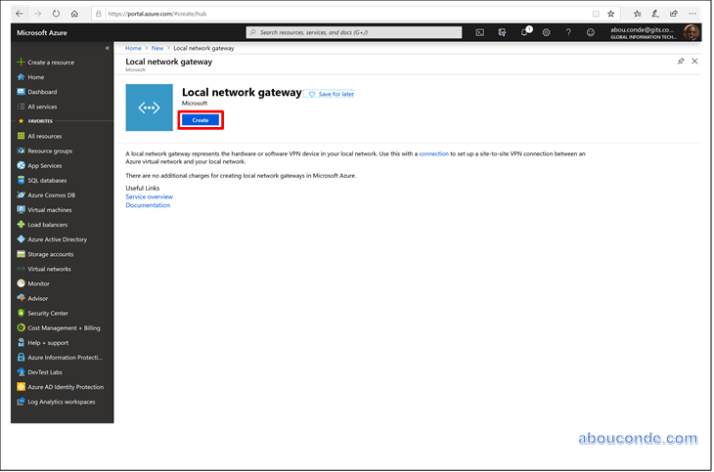
On the Create local network gateway page, specify the values for your local network gateway.
- Name: Specify a name for your local network gateway object.
- IP address: This is the public IP address of the VPN device that you want Azure to connect to. Specify a valid public IP address. If you don’t have the IP address right now, you can use the values shown in the example, but you’ll need to go back and replace your placeholder IP address with the public IP address of your VPN device. Otherwise, Azure will not be able to connect.
- Address Space refers to the address ranges for the network that this local network represents. You can add multiple address space ranges. Make sure that the ranges you specify here do not overlap with ranges of other networks that you want to connect to. Azure will route the address range that you specify to the on-premises VPN device IP address. Use your own values here if you want to connect to your on-premises site, not the values shown in the example.
- Configure BGP settings: Use only when configuring BGP. Otherwise, don’t select this.
- Subscription: Verify that the correct subscription is showing.
- Resource Group: Select the resource group that you want to use. You can either create a new resource group, or select one that you have already created.
- Location: Select the location that this object will be created in. You may want to select the same location that your VNet resides in, but you are not required to do so.
When you have finished specifying the values, click the Create button at the bottom of the page to create the local network gateway.

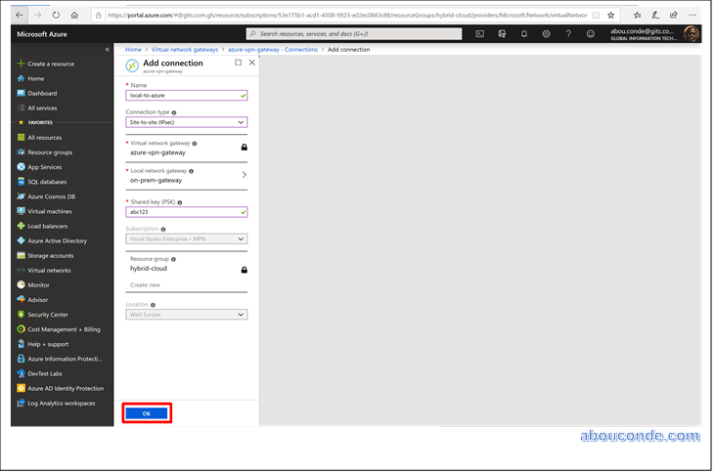
Create the VPN connection
Create the Site-to-Site VPN connection between your virtual network gateway and your on-premises VPN device.
Open the page for your virtual network gateway. There are multiple ways to navigate. You can navigate to the gateway by going to Name of your VNet -> Overview -> Connected devices -> Name of your gateway.
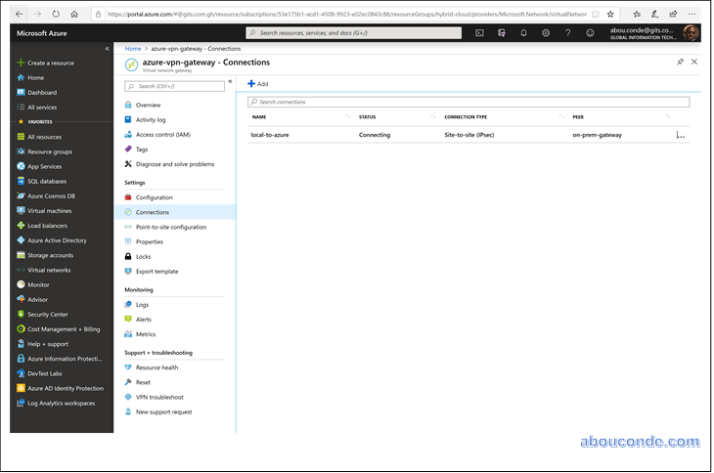
On the page for the gateway, click Connections. At the top of the Connections page, click +Add to open the Add connection page.
On the Add connection page, configure the values for your connection.
- Name: local-to-azure
- Connection type: Select Site-to-site(IPSec).
- Virtual network gateway: The value is fixed because you are connecting from this gateway.
- Local network gateway: Click Choose a local network gateway and select the local network gateway that you want to use.
- Shared Key: the value here must match the value that you are using for your local on-premises VPN device. The example uses ‘abc123’, but you can (and should) use something more complex. The important thing is that the value you specify here must be the same value that you specify when configuring your VPN device.
- The remaining values for Subscription, Resource Group, and Location are fixed.
Click OK to create your connection. You’ll see Creating Connection flash on the screen.
You can view the connection in the Connections page of the virtual network gateway. The Status will go from Unknown to Connecting, and then to Succeeded.